
Learn how to verify your domain so you can send emails from your own branded email address.
Domain verification proves that you own or control the domain you want to use for sending emails.
For example, instead of sending from a generic address, you can send from:
newsletter@yourbusiness.com
hello@yourbusiness.com
updates@yourbusiness.com
This makes your email look more professional and helps email providers trust your messages.
Why Domain Verification Matters
Domain verification helps:
- Prove that you own your sending domain
- Improve email delivery
- Reduce the chance of emails going to spam
- Protect your brand from spoofing
- Allow OHWO to send emails using your domain
- Build trust with your subscribers
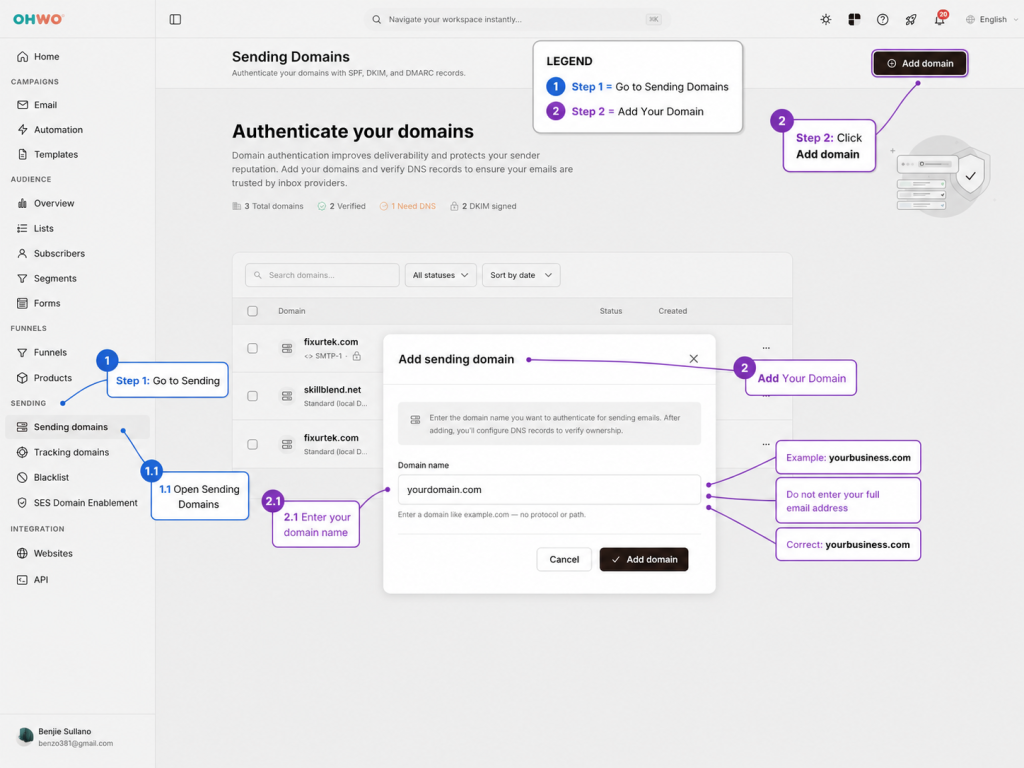
Step 1: Go to Sending Domains
From your OHWO dashboard, go to:
Sending ->Sending DomainsStep 2: Add Your Domain
Click:
Add Domain in the upper right of the windowIn popup window Enter your domain name.
Example:
yourbusiness.comDo not enter your full email address.
Correct:
yourbusiness.comIncorrect:
hello@yourbusiness.com
Step 3: Copy the DNS Records
After adding your domain, OHWO will show DNS records that you need to add to your domain provider.
These may include:
- SPF record
- DKIM record
- DMARC record
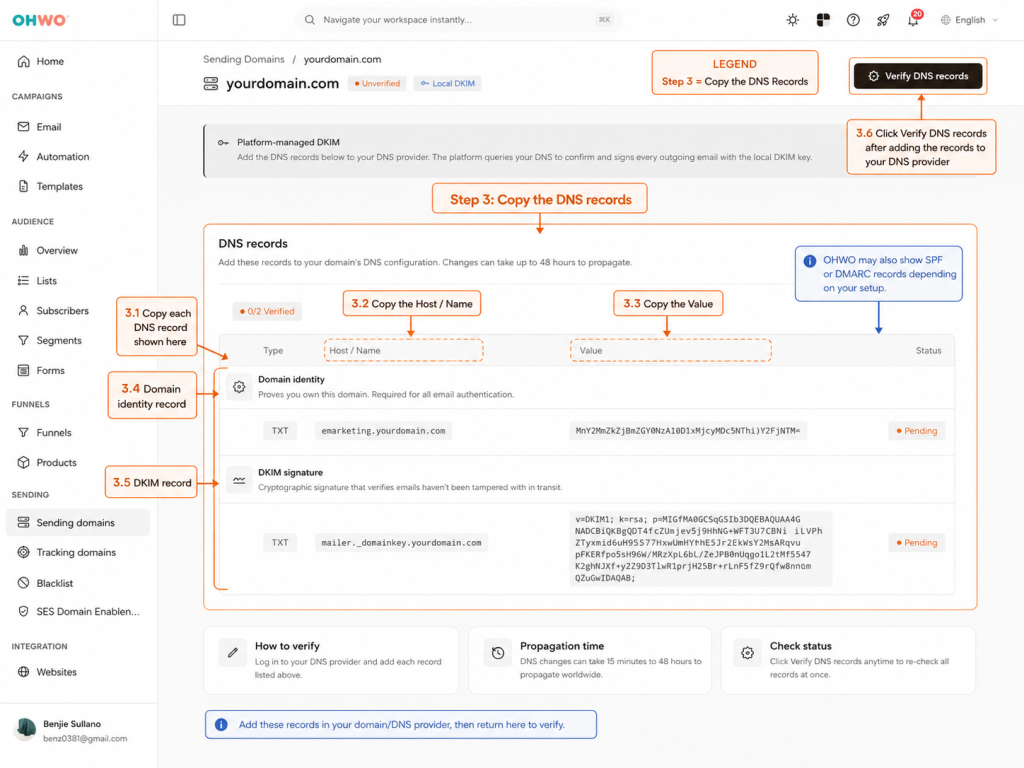
Step 4: Open Your DNS Provider
Log in to where your domain DNS is managed.
This may be:
| Provider | DNS Management Guide | Short Description |
|---|---|---|
| InMotion Hosting | InMotion: Using the Zone Editor in cPanel | Use this if your domain DNS is managed inside cPanel. Go to cPanel → Domains → Zone Editor, then add the TXT, CNAME, MX, or other DNS records required by OHWO. |
| SiteGround | SiteGround: Manage DNS Records | Use this if your domain uses SiteGround nameservers. Go to Site Tools → Domain → DNS Zone Editor to add, edit, or delete DNS records. |
| GoDaddy | GoDaddy: Manage DNS Records | Use this for domains using GoDaddy nameservers. Open your domain DNS page and add the OHWO TXT, CNAME, or other records from the DNS records section. |
| Namecheap | Namecheap: Set Up Host Records | Use this for domains managed in Namecheap. Go to Domain List → Manage → Advanced DNS → Host Records, then add the OHWO records. |
| Hostinger | Hostinger: Manage DNS Records | Use this for domains managed in Hostinger hPanel. Go to hPanel → Domains → DNS, select your domain, then add, edit, or delete DNS records. |
| Google Domains / Squarespace Domains | Squarespace: About the Google Domains Migration | Google Domains has moved to Squarespace Domains. Former Google Domains users now manage their domain and DNS settings through Squarespace. |
| Squarespace Domains | Squarespace: Add DNS Records | Use this for domains managed in Squarespace. Open the Domains dashboard → select your domain → DNS, then add the custom records provided by OHWO. |
| Squarespace Email DNS Records | Squarespace: DNS Records for Email | Useful when setting up email authentication records such as SPF, DKIM, DMARC, TXT, and other email-related DNS records. |
Look for a section called:
DNS
DNS Management
Zone Editor
DNS Records
Advanced DNS
Step 5: Add the DNS Records
Add the records exactly as shown in OHWO.
Be careful with:
- Record type
- Name or host
- Value or content
- Priority, if required
- Proxy status, if using Cloudflare
For email-related DNS records in Cloudflare, use:
DNS onlyDo not use orange cloud proxy for email authentication records.
Step 6: Save the DNS Records
After adding the DNS records, save your changes.
DNS changes may not verify immediately. It can take a few minutes to several hours for DNS updates to appear.
Step 7: Go Back to OHWO and Click Verify
Return to OHWO and click:
VerifyIf everything is correct, your domain status should change to verified.
If it is still pending, wait and try again later.
Common Mistakes
| Mistake | Explanation |
|---|---|
| Entering full email instead of domain | Use yourdomain.com, not hello@yourdomain.com |
| Wrong DNS host/name | Some providers automatically add the domain name |
| Duplicate SPF record | A domain should normally have only one SPF TXT record |
| DKIM record missing | DKIM is important for domain authentication |
| Cloudflare proxy enabled | Use DNS only for email records |
| DNS not propagated yet | Wait and verify again later |
Completion Checklist
[ ] Domain added in OHWO
[ ] SPF record added
[ ] DKIM record added
[ ] DMARC record added
[ ] Domain status verified
[ ] Sender email is ready